Sunday, January 31, 2010
Cocoa Daisy Reveal night!!
It's reveal night at Cocoa Daisy, stop by and check out the fabulous February kit and add-ons as well as the Daisy Divas latest creations.
CHA pictures coming soon!!
Busy painting and putting my room back together - promise to get my CHA pictures posted soon!!
Friday, January 22, 2010
The wall is all gone!
My scrap room is coming along really well! Here is my brother tearing down the wall (and that little fur ball is Deli, I think he does a great job of supervising):

And here it is with the wall completely down, the old door way filled in and drywall hung:

Some trim work, carpeting (luckily we have a big piece left over from when we did the basement) and a bit more mudding on the seams and the room will be ready for Greg and I to paint!! Should be ready by the time I get back from CHA. I leave for CHA tomorrow and I can't wait to see friends and all the great new product. Have a wonderful week and I promise to bring back lots of pictures!
Wednesday, January 20, 2010
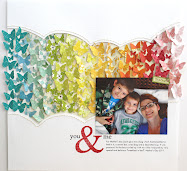
Some Cocoa Daisy February sneaks!
Just a few little sneak peeks of what I have created using the Coca Daisy February kit:


Hmmmm.....is that spray mist I see? I wonder if that could be part of the kit........... :)


Hmmmm.....is that spray mist I see? I wonder if that could be part of the kit........... :)

Monday, January 18, 2010
Cocoa Daisy give away!!
Wouldn't you love to win some great American Crafts goodies? All you have to do is go to the Cocoa Daisy blog and leave a comment telling us what new line coming out at CHA is your favorite!


Saturday, January 16, 2010
Tutorial using glossy surfaces with spray ink.
I wanted to share a fun spray ink technique that I used on this layout that I created with the January Cocoa Daisy kit.


I discovered this technique by accident -don't you love when that happens! I received a set of MAC makeup brushes for Christmas and loved the packaging almost as much as the brushes. I knew it would make a great mask for spray ink.

After playing with it on a different layout I realized that the spray ink would bead up on the glossy surface & run together. When I turned the mask over and wiped it on my scrap paper to clean it off I ended up with this beautiful water color effect, a perfect background for the picture of Greg on the helicopter.
This is how I did it:

First you will need 2-3 different spray inks, and a mask/stencil. You could make your own mask from a sheet of heavy glossy paper and some paper punches, any ready made plastic stencils or masks would work as well. For my layout I wanted to layer the spray ink, so first what I did was use a scrap piece of paper to mask off where I wanted my title and journaling and sprayed over it with a light layer of spray ink:

Next I sprayed the glossy surface of my mask with spray ink (I ended up adding "Carmel Apple" glimmer mist also) turned it over and pressed it onto my paper. Make sure you practice on some scrap paper first, so you know how much ink you want to use and you get a feel for how it will look on your finished project, you may want it to be very subtle, so you would press it on a scrap piece of paper then onto your project (in a sense "kissing" off some of the extra ink). After a few test runs I discovered I liked the effect I got from laying the mask down and smearing it slightly before lifting it up. This is what I ended up with:

I think it really has a great beach feel to it.
Have some fun with this technique, just play on some scrap pieces of paper with different color combinations and masks and I am sure you will love the result!!
Friday, January 15, 2010
Tearing down a wall!
I am so excited!! We are tearing down the wall between my scrap room and the guest room and making it into one big room! The demolition started this morning so last night before bed I gave the boys a bucket of markers and said "write on the wall all you want"!! They thought that was the coolest thing ever - in fact to quote Zach "Mom! This is SWEEEEEET!"
So here are some pictures of our little drawing party:


What would be the next best thing to writing on the wall? Well that would be tackling your big brother and writing on him!


I'll have more pictures of the progress of my room's transformation as it moves along! And I will be posting a fun spray ink tutorial later tonight!
Tuesday, January 12, 2010
Blogging!
I don't usually make New Year's resolutions, but I did decide that this year I am going to try and blog more often. Yes, those of us that blog say this all the time, but I feel that if I have a plan of action I just may be able to do it! Now if you know me, you know I am a big list maker, can't seem to function (at least not function well) without my lists close at hand. So to tackle this whole self-imposed desire to be a better blogger I am making a list of some things I would like to blog about on a regular basis. Aside from what I normally blog about I know I need to add some more pictures and little day to day stuff the boys are into for Grams and Poppy. I am also toying with the idea of having a day each week to share a little tip or trick related to scrapbooking (if there is anything you would like me to demonstrate just leave me a comment). I think I will make sure and add some links to other sites that I find interesting too. So there is my list, it's not a long one, but a list non-the-less and now I feel much better!!
I have been meaning to post about the amazing class I took this last fall from Dina Wakley called "The Graffiti of my Life". I took the class because it was not my normal style. I am very linear and precise with what I create and thought it would be a good creative exercise for me to just let go and play with some paint. So glad I did!! Here is what my Art Journal ended up looking like, I don't want to say it's finished as I have plenty of room on the pages to add more "graffiti".


I have been meaning to post about the amazing class I took this last fall from Dina Wakley called "The Graffiti of my Life". I took the class because it was not my normal style. I am very linear and precise with what I create and thought it would be a good creative exercise for me to just let go and play with some paint. So glad I did!! Here is what my Art Journal ended up looking like, I don't want to say it's finished as I have plenty of room on the pages to add more "graffiti".


Thursday, January 7, 2010
December Daily days 14-25!
Sorry this took me so long to get to! Here are the rest of my December daily pages (and a look at our trip down to VA).

Day 15 was the day of the boys Christmas play at school. I had quite a few photos as well as the program so I simply used an envelope for that day and slid everything inside.


I had a lot of fun with day 18! I stitched a Starbucks cozy onto a Creative Cafe felt library pocket and used it hold a tag with the picture and journaling for that day. I also loved Ali's idea of including a shopping list, so I tucked my list into the pocket as well.


I have never sewn a transparency grid before, but I loved the look of the one that Ali did so I gave it a try, it takes a bit of practice but I was very happy with the end result.


If you didn't do a December daily this year I highly recommend you do one next year. I love the process of capturing a moment each day of the holiday season. It really does make you stop and take it all in amidst the craziness of December.
Subscribe to:
Posts (Atom)