Sunday, September 27, 2009

Oct. Cocoa Daisy sneaks and some randomness!

I have been busy playing with the October Cocoa Daisy kit:


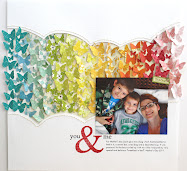
Here are a few sneak peeks of what I have gotten done so far:


Reveal night is October 1st 12am EST and we have some fun things planned! I hope you can join us on the Cocoa Daisy message board.

A couple of weeks ago my Mom and her sisters (my Aunt Pat and Aunt Sally) came over for a little card class. Every month my Mom and her sisters get together have lunch and do something creative. Well this month Mom asked me if I would have them all over and do a little class on either cards or scrapbook pages. I was thrilled with the idea! I love to share what I know with others and to teach people how to do new things. Just for fun Mom didn't tell them where they were going, so it was fun to have it all be surprise! I created these two cards for us to make:


We worked with masks, spray ink, paint and lots of border punches. The ladies did an amazing job on their cards and we all had so much fun creating together (and eating peach pie)! I really did enjoy having them over and can't wait to have them over in November when I will help them put together a little Christmas mini album.

Hope your weekend is going well!

Wednesday, September 23, 2009

October project kit!!

This Halloween mini album has just the right amount of spookiness to help you document all those scary and not so scary loved ones in your life. It is full of fun new product from CHA summer including the Twilight line from Pink Paislee, the Eerie line from Basic Grey and a bit from Making Memories as well. We have even thrown in some glitter to play with! You are going to love creating with this kit. Complete instructions on how to create the mini album are included with the kit.

ETA: Kits go up for sale October 1st at Cocoa Daisy.

Here are a few pages from the album:


Monday, September 21, 2009

followers

I was having a glitch with my followers showing up on my side bar. I deleted it and then added it back on, hopefully this will fix the problem. If you were following this blog you may want to sign up again. Sorry about that :)

October project kit.

After taking a little break this month from putting together a project kit (you would be surprised at the amount of time involved in picking out and ordering product, assembling the project and writing up instructions) I am thrilled to show you a little sneak peek of what is to come for October! Last October's Halloween mini was so well received that I thought I would do another! Not to mention I just had to use some of the new Pink Paislee Twilight line!! I will be busy working on it the next couple days, can't wait to show you the finished project!

Thursday, September 17, 2009

paint + "junk" = FUN

It is no secret that I love circles and one of my favorite ways to add circles to my layouts is by stamping them on with paint. There are so many different things you can use to create a stamped circle. The best part is they are just found items everyone has in their home, can you say RECYCLE!! The following pics show you how to use found items to create stamped circles.

A few of the things that I like to stamp with are paper towel and toilet paper tubes, the plastic ring from a tape dispenser, foam cups and bowls and the cap from a spray can (the spray can cap is what I used to make the paint circles on my 1 2 3 Look What I See mini album).


Before I started stamping on my cardstock I sprayed it with some spray ink, just to add a bit of dimension.


Fill a couple trays with a bit of paint (I like to save the left over plastic shells from packaging to use as paint trays) tap your circle, in this case the spray can cap, into the paint and then simply press it on your cardstock. When you press it onto your cardstock you do not need to use a lot of pressure, try not to wiggle it and then lift straight up. If you want another lighter impression simply stamp it again on your page with out dipping it back into the paint. That's all there is to it!


Here is an example using the tape dispenser ring:


If your object is to big to dip into the paint tray just use a foam brush to apply paint to the edge:


When I am using a foam cup or bowl to stamp with I like to punch a small hole in the bottom. This helps me grip it when I stamp so that I can lift it up straight and get a nice clean circle.


The lip on this foam bowl made a unique scallop like impression:

Here is my circle stamped background:


Now that you have some lovely circles and texture on your layout, you can build on them and what better way to do that, than to get out the circles punches! Punch some circles from scrap paper to fit inside your stamped circles:


I hope this makes you want to look around your house and find some things to dip into paint. Have fun and play :)

Saturday, September 12, 2009

1 2 3 Look What I See

I made this little mini album to hold all the photos from our trip to the zoo a few weeks ago. I used the Maya Road mini album that was included in the Cocoa Daisy Anna add-on. I kept it fairly simple, large photos, a little spray mist and some paint circles for fun. I have a bunch of photos from our visit and rather than try to fit them all on the pages I just tucked my extra ones into the little envelopes. All product used on the mini is either from the main Ali kit or the add-ons. I hope the rest of your weekend is wonderful!


Saturday, September 5, 2009

September Cocoa Daisy layouts.

I was so inspired by this months Cocoa Daisy kit that I got 8 layouts done in 4 days! I am a slow scrapper - that is HUGE for me!

This first one I liked so much that I did another one almost exactly like it and created a "set". I really enjoyed working with the 6x12 format and I think I will definitely be doing more.


About 3 weeks ago my niece Mary was over and we walked down the street to pick wild blackberries. We had so many that I decided to make a pie. It turned out pretty good but I think next time I will have to add more sugar, it needed to be sweeter :)


This next layout "itty bitty" was inspired by this CD cover:


For this one I cut some circles out of cardstock and sprayed over them with Glimmer and Maya Mist.


And the rest of them:


Now I am working on the little Maya Road mini album that came in the Anna add-on. This is a fun little mini that has 4 chipboard pages in it and 4 little envelopes. I am almost done with it, I'll post some pics in a couple days. Have a great holiday weekend!